
The chill is in the air, scarves are being brought out of storage and seasonal shops are prepping to close their doors for the winter months. That’s right, fall is here, which means winter is right around the corner and for many of our customers, this means one thing: time to winterize. Winterizing your kitchen doesn’t have to be a huge undertaking, but it should be done with great care to ensure a successful re-opening come next spring. Today we’ll give you some tips for winterizing your kitchen and equipment, helpful for shops who completely close for the winter, and those who simply scale back their summer offerings.
The main purpose of winterizing your kitchen is to keep equipment and other tools clean, dry and out of harm’s way. This will ensure that your kitchen is bacteria free and ready to rock and roll come spring time. To do so, you do need to take some small maintenance steps before closing up shop.
![]() To start, you’ll need to thoroughly clean and dry equipment and tools. Make sure every nook and cranny is dry before stowing away your equipment. Moisture inevitably leads to bacterial growth, so it is imperative to make sure your items are completely dry.
To start, you’ll need to thoroughly clean and dry equipment and tools. Make sure every nook and cranny is dry before stowing away your equipment. Moisture inevitably leads to bacterial growth, so it is imperative to make sure your items are completely dry.
In the case of AutoFry we recommend taking all of the removable parts off the machine (front door, food entry chute, food exit chute, oil pot, teflon basket, all filters) and cleaning and drying them separately before reinstalling them for winter storage. This will ensure you get the machine completely dry.
![]() Next, if you have any refrigeration or freezers being winterized, you’ll want to prop open doors to prevent any bad odors from developing. The doors don’t need to be left wide open, but keep them propped open at least one inch to ensure healthy air flow.
Next, if you have any refrigeration or freezers being winterized, you’ll want to prop open doors to prevent any bad odors from developing. The doors don’t need to be left wide open, but keep them propped open at least one inch to ensure healthy air flow.
![]() For all other equipment, you’ll want to make sure that you’ve disconnected machinery from electric, gas and water supplies. This is especially crucial for water lines – make sure to get rid of any residual water that could lead to bacteria growth or could freeze within pipes and lead to pipes cracking.
For all other equipment, you’ll want to make sure that you’ve disconnected machinery from electric, gas and water supplies. This is especially crucial for water lines – make sure to get rid of any residual water that could lead to bacteria growth or could freeze within pipes and lead to pipes cracking.
![]() Next, in the process of winterizing your kitchen, you’ll want to apply stainless-steel polish, where applicable, to protect surfaces from dust and scratching and then cover everything with either plastic bags or drop clothes. This will keep dust out and protect your equipment from other external elements.
Next, in the process of winterizing your kitchen, you’ll want to apply stainless-steel polish, where applicable, to protect surfaces from dust and scratching and then cover everything with either plastic bags or drop clothes. This will keep dust out and protect your equipment from other external elements.
![]() Finally, you’ll want to make sure there is a good place to properly store your equipment. It should be a cool, dry location, and for extra precaution you should secure items to prevent equipment from being knocked over.
Finally, you’ll want to make sure there is a good place to properly store your equipment. It should be a cool, dry location, and for extra precaution you should secure items to prevent equipment from being knocked over.
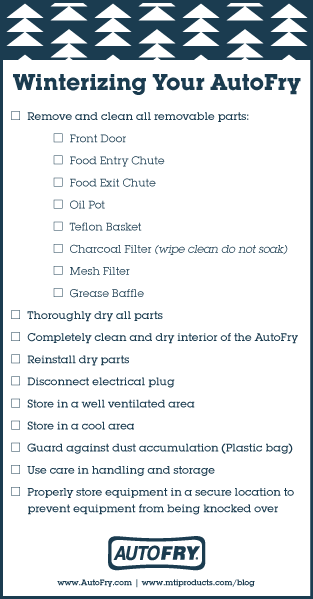 As you can see, it doesn’t take a lot of work to be well prepared for the next season. The key components to success are ensuring all things winterized are clean, dry, disconnected and put away. With that in mind you’ll be ready next spring for another successful season ahead! To make things easier for our customers, we’ve created a quick checklist for winterizing your kitchen, specifically looking at our AutoFry, ventless fryer. Give it a download here and share it with your employees as you wrap up your 2016 season.